Hi, I ‘m Daniela, the SolidWorks and SolidWorks PDM SME for SPK and Associates. Today, we’ll discover SolidWorks automation. That means how to automate certain tasks using your workflow, So, in the video, I’ll show you some popular practices. I’ll also show you some things that I do frequently within workflows that you can apply either now or at a later date. Everybody’s process grows and evolves so it you may find use for these these features down the line.
PDM: SolidWorks Automation Workflow Example
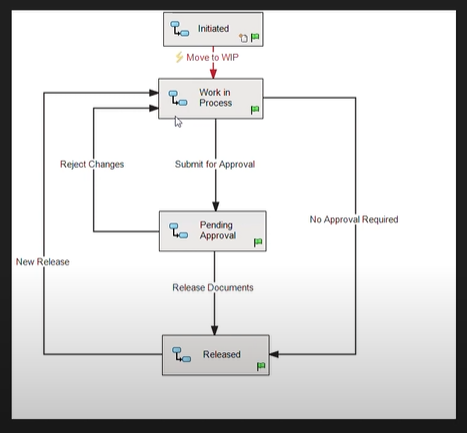
So, to get started we’re looking at a pretty straightforward workflow. This is just an example. Usually, everyone’s workflow is very very different and it’s really what fits for your company. But, the example below is very straightforward. We’re going to be focusing on the transitions.

SolidWorks PDM Conditional Transitions
First, let’s look at “Submit for Approval“. Here you can set conditions. So, let’s say that you usually have dot control go in. Alternatively, a checker or a reviewer. They will make sure that there’s a revision variable or that there is a description. In that case you can make their lives a bit easier by going into the Conditions tab.
By following the video, you will see I click on the ‘Submit for Approval’ transition. Then, I click on the “Conditions” tab to get to a menu. Within this menu, you can select a variable comparison. So, you can say “must equal….’. You can set your own logic, value and configuration path.
That means you can really tailor this as needed.
Now you can ensure it has a specific value. Or you can say “must have a value cannot be blank”. So, that’s very helpful for description. You don’t always know what that description is going to be, You just want to make sure that there is something in that field. Therefore, this is a great way to do that and to reduce the amount of manual oversight or checking.
SolidWorks PDM Workflow Actions
We also have the actions tab and it’s right next to conditions.
Here you have a plethora of activities. For example, you can set a variable, which I find very helpful and I do fairly often. To do this, click “Add” once you are inside the actions menu. Then, you’ll have a screen similar to mine in the video above. Here you have some options. You can execute a command a task export data.
The actions I use the most are to execute tasks and set variables.
Setting a SolidWorks automation for a variable is pretty straightforward. Essentially this means that you have a pre-existing variable. And, let’s say, upon transition you want this variable to be set to a certain value. For example, let’s say once a file is released, we want that to be “yes”. Furthermore, we want that only when it’s released. Not at the beginning of our workflow, or when our file is set to review. As we only want to set this variable when the file is released it’s a prerequisite is to have this file. Once you do, it should appear in your drop down list. You may also need to have this added to your data card. You can specify the value “yes” or “no”.
This drop down menu, as shown in the video above, also gives you other options too. So, if you don’t want to choose “yes” or “no”, you can set your own variable instead. Additionally, you can also populate it with the last comment by using the timestamp. You have a lot of options at your disposal. Typically, I run it for all files.
Creating a PDF with Solidworks PDM Automatically
Lastly in this SolidWorks automation update, let’s cover an automation task for executing a PDF.
I strongly recommend setting this up. Workflow wise, you can do it the very same way. We just looked at .zip variable. You’ll want to click on your transition where you’d like that PDF to be generated. Next, you’ll want to go to “actions” and “add action”. Then, select “execute task”. Now you can select the task that you would like to run, usually a PDF task.
There are some prerequisites associated with allowing automatic PDF generation. For example, you do need to create that PDF task. Additionally, you will need to specify a few things. For example permissions for who is allowed to run this task. Also, on the on the infrastructure side, you’ll want to make sure you have a task server. We can cover those in another video later down the line. but if you need support before that, you can contact me here for further support.
Subscribe to our YouTube channel for even more SolidWorks PDM help, tricks and tips!
Looking for further support and SolidWorks PDM help? Contact our experts today.


